Carefully Crafted Details
This dramatic makeover in Marin County transformed a solidly 1970’s interior into a bright sophisticated retreat featuring traditional design elements with a nod to the client’s French heritage. What began as the remodel of a couple bathrooms expanded in scope significantly to include a Guest Bedroom, the full Primary Suite, and new door hardware and repairs throughout the residence. We knew the stylistic update would be a significant change, but we were especially eager to correct functional issues with the space.
Problems to Solve
Aside from a desire to refresh features such an avocado-colored bathtub and sink, 1970’s flower tiles, and wide colorful grout lines, there were functional problems with the bathrooms. Standard cabinets had been installed, but the toilets were too close to the cabinets. The cabinet doors could only partially open to 45 degrees until they collided with the toilets. Although, the cabinets provided ample towel storage, it was challenge to access.
Both bathrooms had 24” deep cabinets in front of windows that were recessed an additional 24” deep in the mansard roof. The bathroom windows were essentially inaccessible. The client had to climb across a combined 48” of countertop and window ledge to open the windows, which provided the primary ventilation in both bathrooms. Mold was forming on the drywall because it was too difficult to reach and open the windows and there were no bathroom ceiling fans. The deep window ledges were originally finished in painted drywall only, which was not a durable surface. Two of the bedroom window ledges became rough and pitted over time and two of the bathroom window ledges were tiled over in the 80’s and ready for a new look.
The Primary Bath shower was especially dark and awkward with shower bench that wasn’t useable due to its tapering shape created by a curved wall. The L-shaped Primary Suite closets were also problematic because storage at the corner was difficult to reach. The sliding doors further hindered access to the closets since only half of the closet can be open at one time. The existing wood burning fireplace in the Primary Bedroom was not properly installed. The wooden mantel directly overlapped the firebox and was not separated by noncombustible material, presenting a fire hazard. Furthermore, it was raised on long tiled bench that took up took space in the room. Space permitting, the client requested a separate water closet at the Primary Bathroom and an en suite coffee bar with refrigeration for her latte milk.
Solutions
I proposed custom cabinetry at the Guest Bath with a shallower 12” deep countertop in front of the recessed window so that it was possible to reach across and operate the window beyond. Although the countertop was reduced in depth, we were able to recess the cabinetry into the wall and capture additional space. So, the cabinetry below the window ledge is is significantly deeper than it appears. The overall width of the vanity was also lengthened near the tub. Adding medicine cabinets at both bathrooms introduced significant storage space. Since the medicine cabinets had internal outlets, electric toothbrushes no longer needed to be kept on countertop.
The Primary Suite had more opportunities for improvement. To accommodate a separate Water Closet, the existing vanity was removed, and the toilet was relocated under the window. This allowed the window to be operated with greater ease. The wall that originally separated Bathroom from the Dressing Room was removed to create the space required to maintain two sinks at the new vanity. The shower was expanded widening the shower bench and adding a tall niche for oversized shampoo and conditioner bottles. A new heated towel bar was recessed in the Water Closet wall close to the shower.
New cabinetry was designed for the Primary Bathroom vanity with a full height storage cabinet and a laundry pullout below. The fireplace was lowered to the floor and the long tiled bench was removed. A built-in coffee bar with a paneled under counter refrigerator would be added to the bedroom making use of the awkward space at the corner of the two closets.
Considering aging in place, we included a grab bar at the Primary shower and provided blocking for a future grab bar at the Primary Water Closet. Hand showers were included at both bathrooms for greater flexibility. The Primary shower bench was heated for comfort. We added a Toto washlet to the Primary Suite but decided to provide power for a future washlet at the Guest Bath and use the existing toilet for the time being. Round doorknobs were replaced by lever handles throughout because they are easier to grasp and turn.

Redlined Floor Plan Revisions
The Look
The client wanted the look of a traditional home. To achieve this end, crown and baseboards were added, which required flex mouldings at a curving wall. Honed Calacatta marble countertops with ogee edge profiles were selected and the same detail was repeated at the deep window ledges. At the guest bathroom the window ledge was located over the countertop presenting an opportunity for continuous stone to waterfall from the sill down the wall across the countertop. A luxurious coordinating Calacatta marble base board tile was selected for the Water Closet. A full stone backsplash and countertop would also be used at coffee niche.
The client was particularly fond of cleaning with bleach and harsh abrasives but wanted natural stone bathrooms. We decided to use natural stone for countertops the floors outside the showers, but predominantly ceramic tile inside the showers. To keep the tile design more traditional, I chose the Walker Zanger, 6th Avenue Collection in matte white, specifically because that tile collection featured a wide selection of coordinating tile trim pieces to match the subway tile. The rail moulding tile framed each niche nicely and was also used to finish the edges of the subway field tile. Marble accents were incorporated parsimoniously and higher on the shower walls, where they would be exposed to minimal shower splash.

Guest Bath 1 Moodboard

Rendering of Guest Bath 1

Primary Bathroom Elevations
Design
The client requested that the fleur-de -lys was incorporated as a nod to her French heritage. The decorative tile available featuring that pattern was too rustic, hokey, or not suitable for a wet environment. I drafted a fleur-de-lys in CAD and sought out local stone artisan, Andrzej Stryczek of Spirit of Stone to fabricate a solid stone dimensional carving with beveled edges to stand proud of the ceramic shower tile. I utilized a version of the stone fleur-de-lys on the accent wall of each bathroom shower. For ease of installation, the ceramic subway tile surrounding each fleur-de-lys was waterjet to make the necessary cuts in the ceramic tile that perfectly follow the contour of the marble forms.
The curved wall at the Primary shower required a small-scale tile to turn the curved wall. I was delighted to find a clover mosaic at Walker Zanger, which I felt was reminiscent of quatrefoils that appear on gothic churches throughout France. Additionally, I ordered custom powder coated vent covers from Pacific Register, which offered a fleur-de-lys pattern in their collection. I also designed a built-in storage unit for the toilet tissue at the Water Closet and repeated the fleur-de-lys pattern on a polished chrome inset door panel.
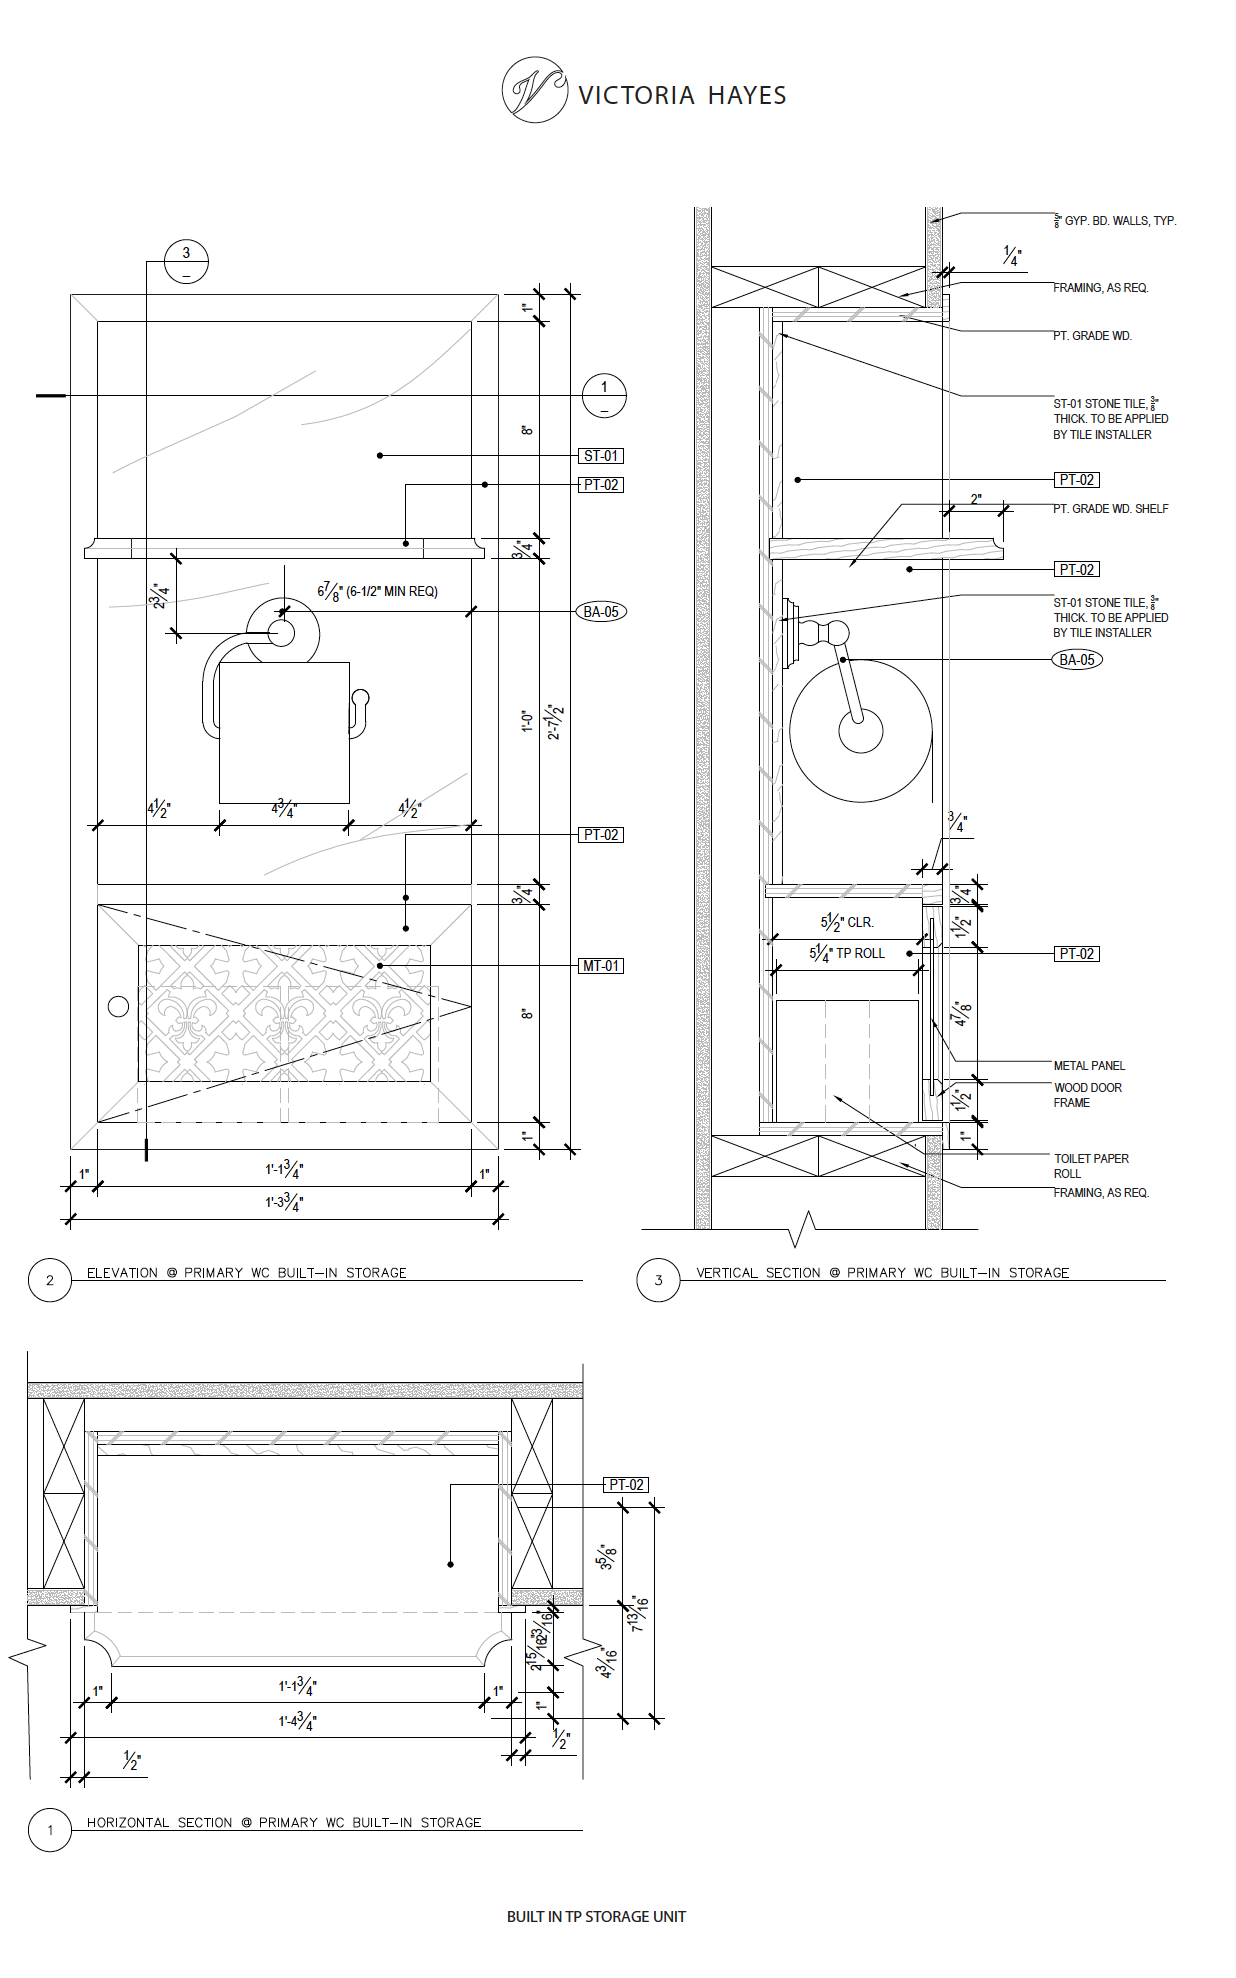
Millwork Drawing for Custom Built-In TP Storage
Construction Administration
In addition to the interior design, I provided construction administration for the project. I was heavily involved throughout the construction process making regular site visits, reviewing shop drawings, submittals, mock-ups, overseeing design intent, and collaborating with the Contractor and his team. I was responsible for templating and ordering flex moulding, laying out the marble tile, and providing designed solutions to problems as required.
Initially the client planned to handle the fireplace selecting a marble mantel online and an insert from a local showroom. However, that wasn’t enough information for the orders to be placed or the components to be installed. I was asked to provide the design drawings required to customize the size the of the mantel, hearth, and surround, select the finish, and confirm that the new insert would fit.
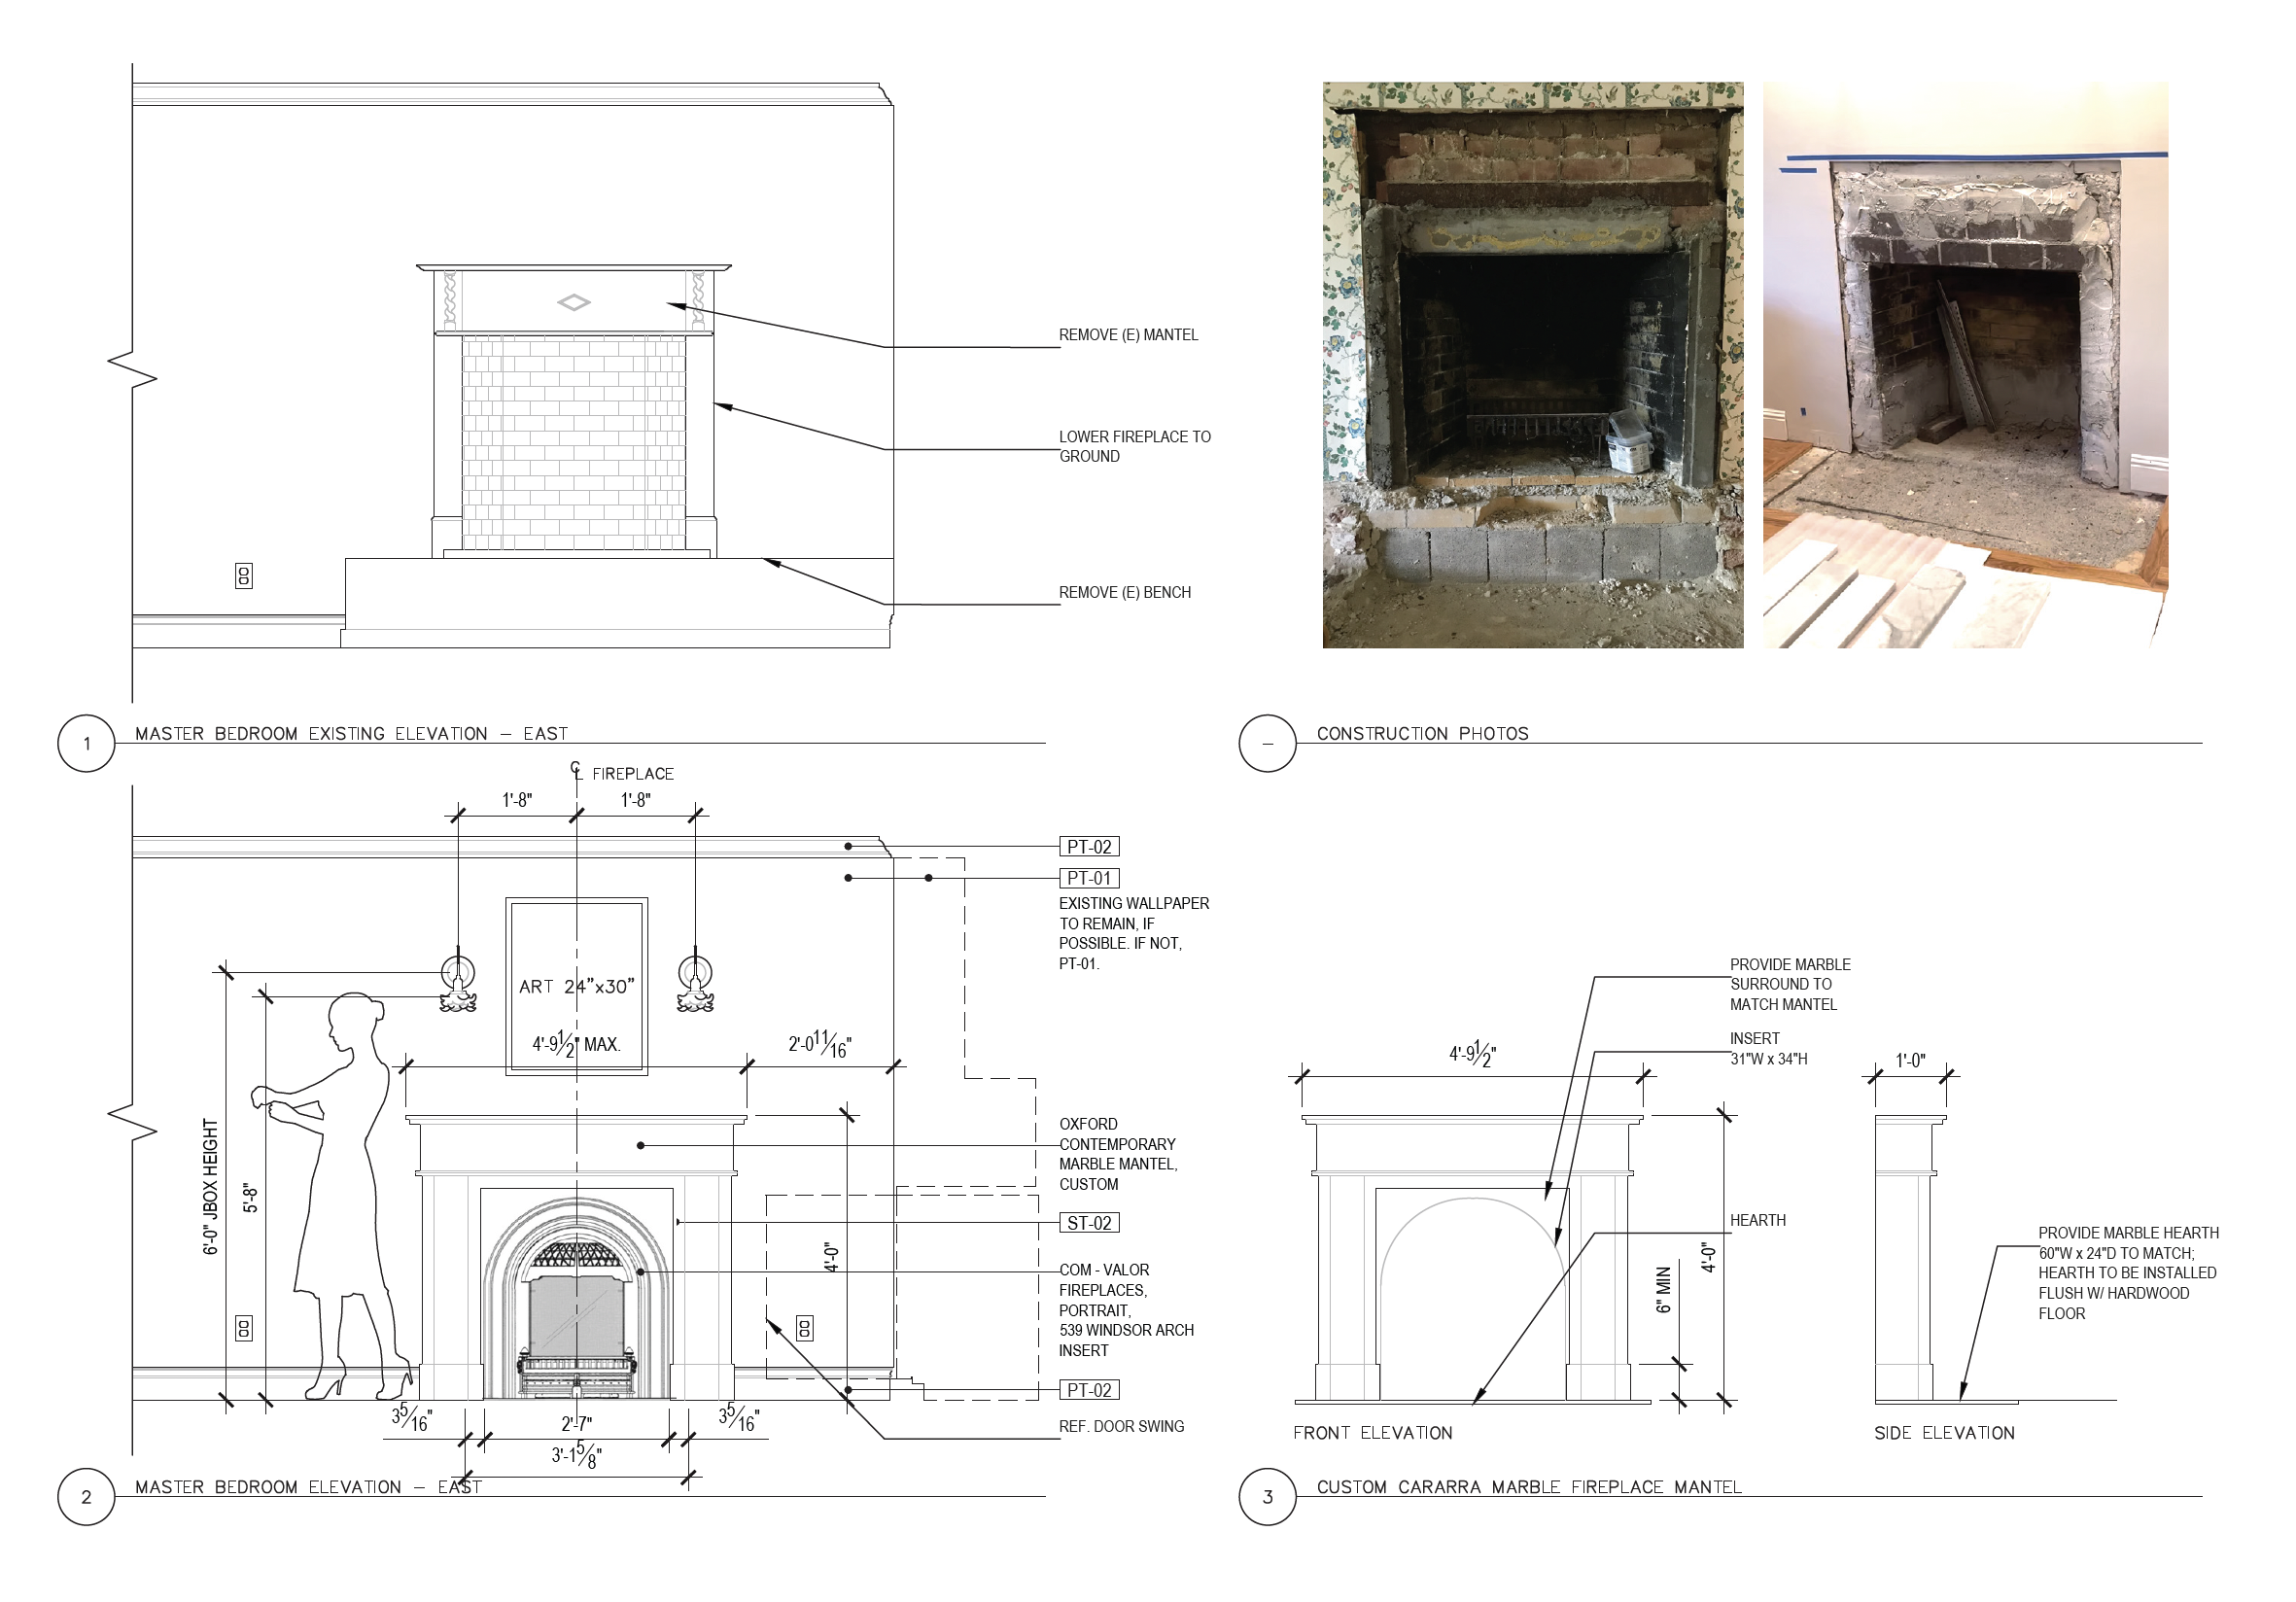
Design drawings for Primary fireplace
I2”x24” honed Calacatta marble tiles were used for both bathroom floors. Since it is a natural stone with a range of whites, creams, greys, and golds with a variety of veining, I separated the stone to be used in each room and arranged each individual tile to achieve the most harmonious layout possible. It was well worth the effort because it had a massive impact on the design. Installing the stone sequentially right out of the cartons would have yielded less aesthetically desirable results. It was an essential step to establishing a consistent and balanced layout and it had a massive impact on the on the design.

Left: Guest Bath floor plan numbering each floor tile | Right: Guest Bath Calacatta marble tiles laid out on the floor and numbered on blue tape corresponding to the locations on the floor plan (left)
Initially, the subway field tile at the Guest Bath shower was intended to run to the ceiling. After tiling the wall, the installer realized that the ceiling was surprisingly uneven. The top row of tile tapered from a 1” tile on the left side of the shower down to a sliver of a tile on the back wall and then terminating in awkward extra wide grout joint on the right shower wall. Unfortunately, the tapering tile was distracting to the design and drew attention to the fact that the ceiling was uneven. To camouflage this architectural flaw, I had the tile installer remove the top three rows of subway tile at the ceiling. I added a decorative ridge liner across the top of the subway wall tile and used large 12”x24” marble floor tiles cut to fit between the liner tile and ceiling. The uneven ceiling was not noticeable at all against the wide format marble tile. Since the marble tile was up at the ceiling and far below the splashing water, the maintenance of the marble was not an issue. The addition of marble along the ceiling beautifully integrated the material throughout the bathroom and appeared to be intentional, although it was in truth a solution to an unanticipated design challenge.
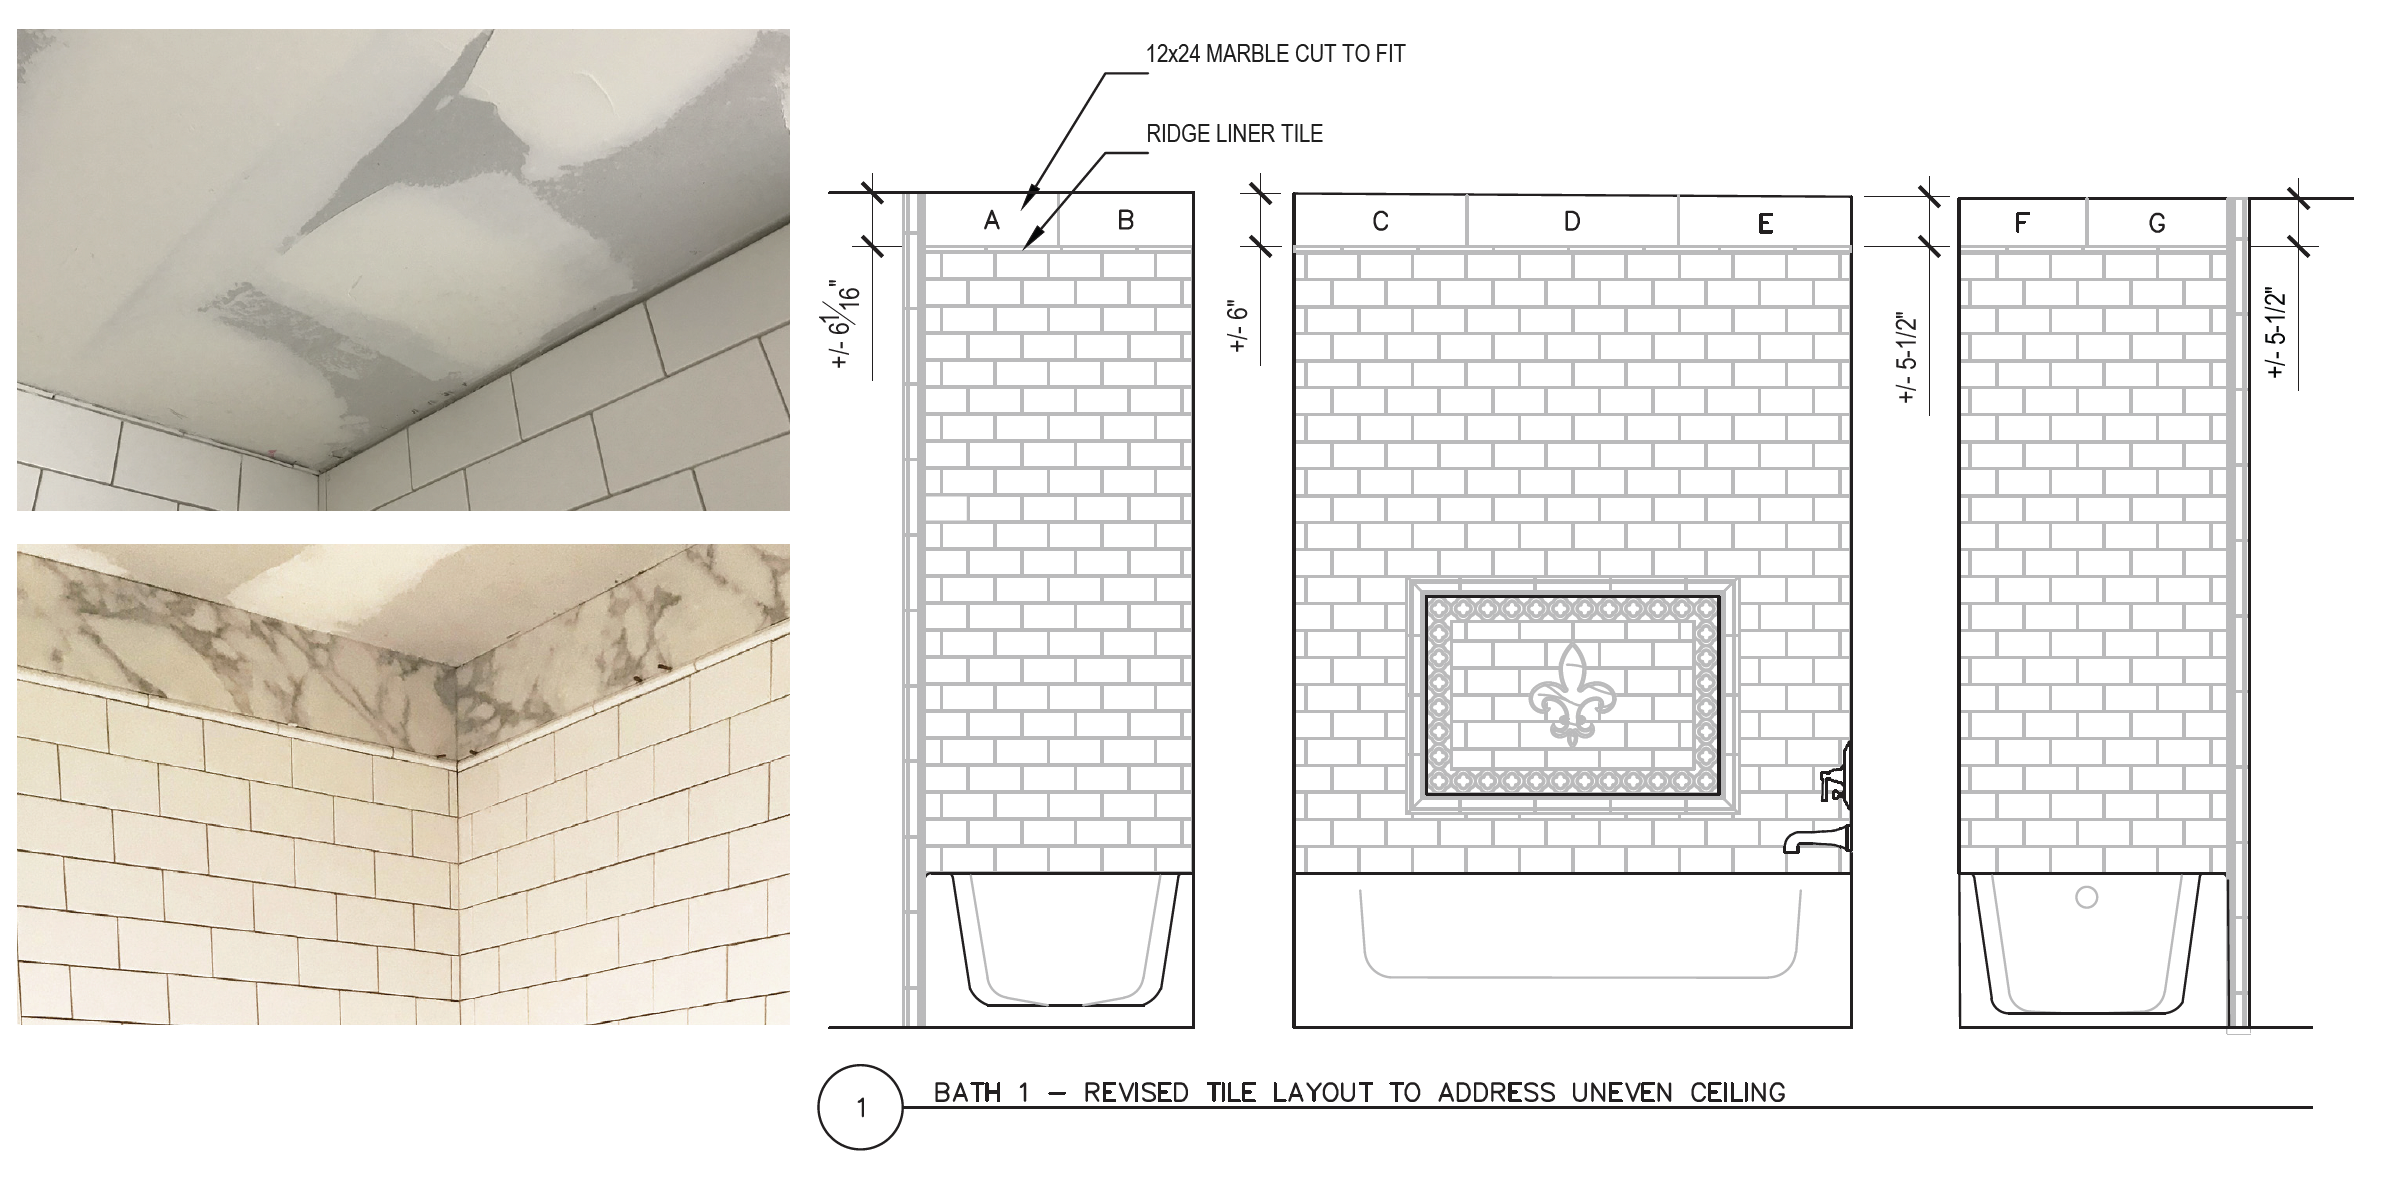
Upper left: tapering shower wall tile due to uneven ceiling | Lower left: design solution with large format marble wall tile along ceiling | Right: elevation mitigating uneven ceiling with large format tiles.